THIS WILL BORE you if you’re not a motorhead, so please do plan your valuable time accordingly.
I’m taking a little time away from the writing desk (paid writing) to report on a fix for the 650 piglet’s fuel problem, which you may recall.
Finished the job just in time. We had snow a few days ago, and now a fresh coat today.
The iron piggy and the piglet snuggled up against the ’49 truck this morning.
Around here we don’t put up with machines that have to be babied.
The truth is, though, as time goes by, I don’t enjoy working outdoors in adverse circumstances as much as I used to. I was glad to get this bit of frozen-knuckle work accomplished before the snow fell.
If you recall, I rode the piglet across Labrador and Newfoundland two summers ago as a tune-up for South America. Who knows if SA will ever happen. The shipping is a nightmare but the industry is being disrupted as we speak, and in a good way. By next fall it may be possible to bypass the freight-forwarder racket and order up a 20-foot sea-transport container online, no middleman.
Will let you know how that works out. But either way, I still need to set up the piglet so I can burn every drop of the 6.6 gallons she carries.
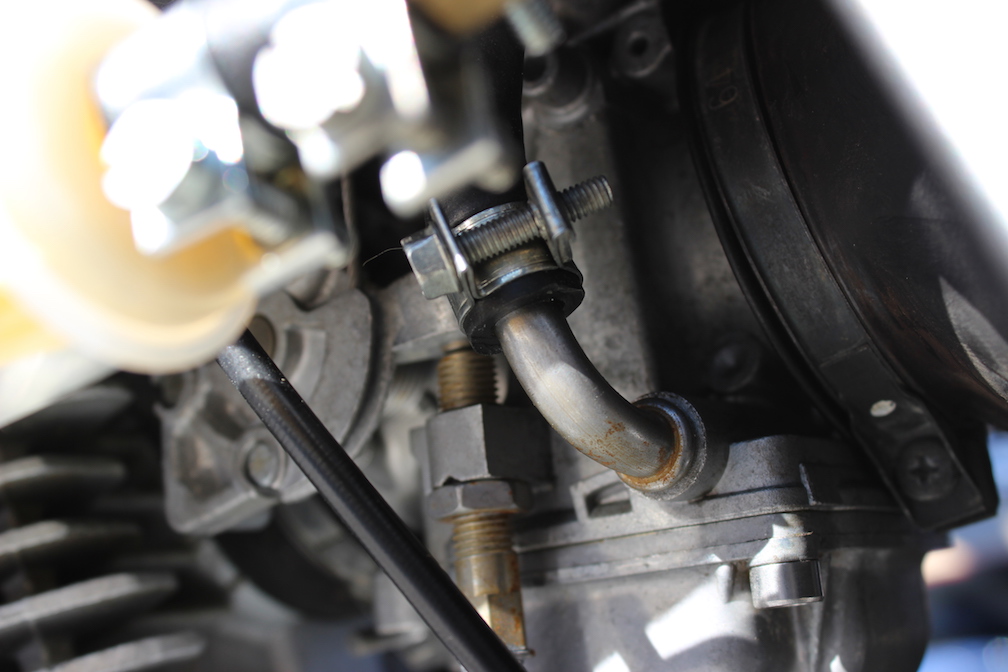
That means either rotating or removing the factory fuel inlet, this steel elbow you see above. Pointing up works fine for the dinky stock tank, not so fine for the aftermarket tank.
Some DR650 riders manage to rotate the elbow to the 3 o’clock or 9 o’clock position without damage. Either position improves the gravity feed from an aftermarket tank.
For me, the elbow wouldn’t rotate without twisting and collapsing, so I cut off the twisted part and ran a tap inside of the stub that remained in the carb. With quarter-twenty threads cut into the piece I could use a quarter-twenty bolt to pull it out.
That’s what’s going on here. The bolt threads into what’s left of the fuel fitting and you turn that coupling nut to pull the remaining piece out. The 9/16 socket creates an empty space for the stub to move into as you turn the nut.
The brass strikeplate and washer are some hardware scraps I used to keep the socket square against the carb. That way the socket exerts force evenly when you turn the nut, reducing the likelihood of damage.
There’s no o-ring or gasket, it’s an interference fit. The inlet is 0.002 bigger than the bore.
0.002 doesn’t sound like much but the stub pulled hard. It came out squeaking and squawking the whole way.
The empty bore measured 0.318. I thought of opening it up with an 11/32 drill bit (0.344). That would have allowed me to thread the bore for a 1/8 NPT fitting.
But tapered threads get wider with every turn. Not a good idea, I thought. There’s not a whole lot of meat around the bore. It would be easy to crack the carburetor by giving the new fitting just a quarter-turn too many.
Tech wizard Mike Connelly, my go-to consultant on such matters, agreed. He suggested straight metric threads, 10mm x 1.0 pitch.
So that’s what I did.
Here’s the bore drilled out to 0.358, the spec for 10mm/1.0.
Here’s the threads going in once the bore was sized for the tap.
Plug tap, then a bottoming tap—perfect threads! Better than I had any right to expect after drilling the bore freehand.
It’s always better to do things like this in a shop, on a drill press, but doing things the hard way is good practice. After the zombie apocalypse it’ll be routine. We’ll all be machining parts on the side of the road, making an effort to stay on the move, keep the machines running, avoid getting our faces gnawed off by the slobbering undead and whatnot.
Threads look good…
And there’s my new fitting, straight, no elbow, 10mm on one side, 1/4 hose barb on the other. Huzzah!
I took the carb apart at this point, to clean out the metal bits that had migrated into the fuel bowl.
And here’s the result. The left and right petcocks feed into a brass tee and then straight into the carb. The tank should drain completely now. No need for head pressure in the tank to push the gas up and around a hose loop that dumps into the factory elbow from above.
I didn’t bother with in-line fuel filters this time. The petcocks are screened, that should keep dirt out.
Inside the screen, there’s the pickup tube for the “On” position. When the fuel falls below the top of the tube, the “Reserve” position will flow the remainder of the gas until the tank is empty.
It’s all screened except for a hole at the top. I don’t know if that’s a manufacturing artifact or what. Maybe the unit needed to be turned on a spindle or…?
I was going to put a sheet metal screw in each, but a customer service rep for the manufacturer advised me not to. He couldn’t tell me why I shouldn’t, but I went with the uninformed official word on that.
Which isn’t at all like me, but it was cold out. Time to finish up, go indoors, get some real work done. Like I need to do now.
Until next time, cheers to all.
Tony DePaul, December 14, 2017, Cranston, Rhode Island, USA


Nice detail, Tony. I wish some of the service manuals I use were as detailed; maybe a second career for you?
Thanks, Will. True, between the details left out and the details gotten wrong, the service manuals do keep us on our toes: torque specs in foot pounds instead of inch pounds. I’ve found errors in wiring diagrams in the original 1949 Ford service manual. An aftermarket Ford manual had photos of the brakes upside down, wheel cylinders at the bottom of the backing plates, star adjustments at the top…
That is my kind of post. I also like the CHINA tee fitting. Well played for a potential world traveler.
Thanks, Brad. As you know, when Dick Cavett asked Forrest Gump what it was like in China, Forrest said, “In the land of China, people hardly got nothin’ at all.” But as it turns out they do have 1/4-inch brass tees, so that’s good.
That looks real good. I predict the end of fuel starvation issues!
Huzzah! Thanks, D.